


September 28, 2026, 6:16 pm | Read time: 7 minutes
Looking for a new yoga challenge? Try the “Standing Compass,” also known as Parivrtta Surya Yantrasana. Those experienced in yoga might already be familiar with the seated version, the Compass (Surya Yantrasana). This can be a great preliminary exercise for the standing version. FITBOOK author and yoga instructor Nina Ponath explains how you can learn the elegant Compass Pose, which resembles a compass needle, step by step.
Why the Standing Compass is so challenging
The beauty of yoga? It never gets boring because there’s always an asana we haven’t mastered yet! Besides the numerous warrior variations, chaturangas, and backbends in all forms, there are countless breathtaking asanas that we often spend a long time mastering. The pride is all the greater afterward.
One such asana is the “Standing Compass,” known in Sanskrit as Parivrtta Surya Yantrasana. This challenging pose combines a deep hip opening with an intense stretch of the back of the legs and pushes our sense of balance to the limit.
The yoga pose “Standing Compass” is more than just a beautiful Instagram motif. For the advanced balance pose, you need absolute presence, core strength, and exceptional flexibility in the shoulders and hips. While standing firmly on one leg, you stretch the other like a pointer to the sky and hold it with the diagonally opposite arm. Sound complicated? It is. In this pose, almost the entire body works together. In return, the asana gives us a deep sense of expansiveness and stability.
The seated Compass
As mentioned, the Standing Compass is the standing variation of the “seated Compass” (Surya Yantrasana). This can be excellently practiced as a preliminary exercise before attempting the standing Compass. It is especially advisable to internalize the mechanics of the pose on the ground first:
Sit upright. Bend your right knee and pull your foot close to your body. Grasp your right foot with your left hand and try to slide your right shoulder as far as possible under your right knee–almost as if you wanted to wear your leg like a backpack. Once you are stable, slowly stretch the leg to the side while the left arm goes over the head. Once the basic principle is clear, it can be translated into standing.
What the standing Compass looks like
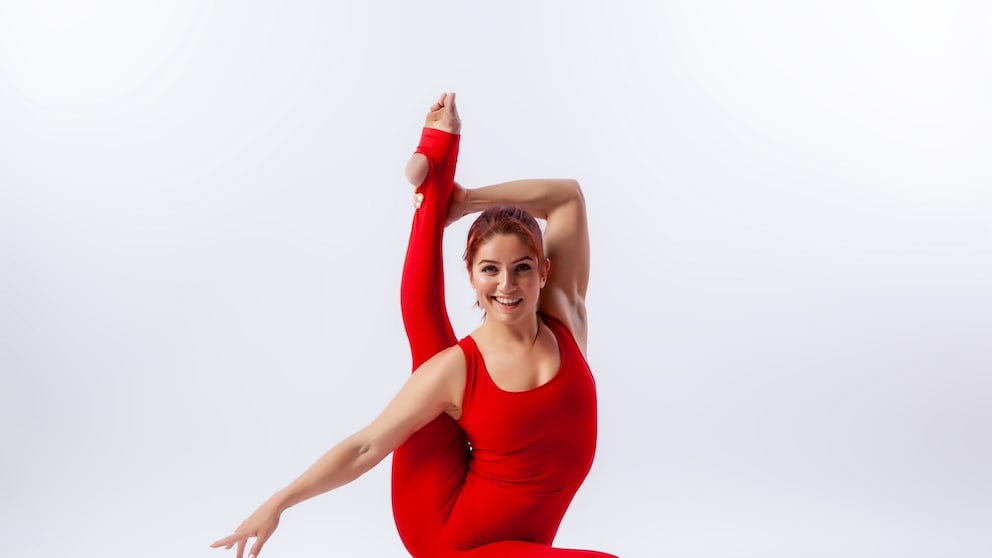
In the yoga pose “Standing Compass,” you stand firmly on one leg while the other is guided upward to the side and brought behind the head or to the shoulder with the help of the hand. The pose resembles a human sundial pointer or the asana “Bird of Paradise”: The elevated leg is ideally fully extended, while the opposite arm reaches over the head and holds the foot. The free arm is extended to the side to create balance and open the chest.
The upper body is in a slight rotation, which gives the pose its name “Parivrtta” (twisted). Overall, the pose appears powerful and elegant–a clear line that only emerges through precise alignment and much practice.
How to learn the “Standing Compass”
Before attempting the asana, it’s essential to warm up the body specifically. Without prepared hip and shoulder muscles, the risk of injury is high.
Preparatory exercises
To prepare for the “Standing Compass,” exercises that stretch the hamstrings and open the hips wide are suitable.
From my experience as a yoga instructor, the Lizard pose is indispensable for this:
Bring one leg far forward to the outer edge of your mat and stretch the back leg out long. The front knee should be over the ankle. To intensify the stretch, you can come onto your forearms. Gently rock your hips to loosen the tissue. This exercise optimally prepares the groin area for the enormous spread in the Standing Compass.
Step-by-step guide for the standing pose
- Create the base: Stand upright and shift your entire weight onto your left foot. Find a fixed point with your eyes (Drishti) to maintain balance.
- Thread the leg: Bend your right knee and reach for your right foot with your left hand. Support your right knee with your right hand and initially cradle the lower leg parallel to the ground in front of your body.
- Position the shoulder: Snuggle your right shoulder or upper arm as deeply as possible under your right knee. Bend your standing leg slightly if needed to create more space.
- Secure the grip: Hold your right foot firmly with your left hand. Now bring your right hand to the side to the ground or actively stretch the arm to the side to maintain balance.
- The stretch: Use the strength of your left hand to slowly stretch your right leg upward and backward. The left arm moves over your head. Open your chest and look under your left upper arm to the side or slightly upward.
The first time I felt tangled
Even though I am very flexible due to my daily practice, my first attempt at the “Standing Compass” was a real exercise in humility. My hand awkwardly searched for the extended leg, the standing leg began to tremble, and I felt quite wobbly. It’s one thing to maintain balance while sitting–and quite another to stretch the leg to the maximum while standing.
During my first attempt, I simply toppled to the side several times because I was so focused on stretching my leg that I could hardly concentrate on my center. Initially, I felt downright tangled. It got a bit better when I focused on actively levering my right shoulder under the knee and placing more emphasis on grounding the standing foot. As is often the case, patience is key here. I probably need to practice this further so that I can hopefully enjoy the pose for more than just two breaths without falling out.
Also interesting: Open hips and strengthen knees–with the Flying Horse pose
What the pose is good for
This asana offers numerous benefits for both the physical and mental body:
- Strengthening the core: To balance on one leg while the upper body rotates, the core muscles from the abdomen and lower back must perform at their best.
- Stretching shoulders, chest, and hips: The pose opens the entire front muscle chain and can relieve tension in the often-tight hip flexors.
- Improving balance and coordination: The interplay of gripping, stretching, and standing trains neural coordination and concentration.
- More flexibility for the spine: The slight rotation of the upper body mobilizes the spine and can counteract poor posture.
“These 4 Yoga Exercises Helped Me With Back Pain”

Open Your Hips and Strengthen Your Knees With the Flying Horse Pose
How this asana feels
When you reach the final position, you feel an intense, almost electric stretch along the back of the elevated leg. The hip on the elevated side feels wide and free, while the standing leg stands like an anchor. In the upper body, the grip over the head creates a spaciousness in the chest that lingers even after the pose.
Can anyone learn the “Standing Compass”?
In principle, anyone can work on the flexibility needed for the “Standing Compass”–but the path is individual. If balance is your limiting factor, practice with your back against a wall first. If the flexibility in the hamstrings is not yet sufficient, a yoga strap can help: Place it around the foot of the elevated leg to artificially extend the arm.
If the “Standing Compass” still seems too far off, the “Bird of Paradise” is a wonderful and slightly more accessible variation to train standing balance with bound arms. In the end, it’s not about achieving the perfect form for a photo, but about mindfully exploring the limits of your own body. The Standing Compass teaches us that even in complicated, “twisted” life situations, we can rely on our center. Once you’ve mastered the pose, you’ll be rewarded with an incomparable feeling of freedom and pride.